Murphy's law struck before my craft show last weekend. My bad back which hasn't given me any trouble in years decided to play up. So my weekend was somewhat held together with ibuprofen! But I still have fun at this small, stress-free show. Just right for a first outing after my long hiatus from craft shows. The friendly crowd was steady throughout.
It wasn't just about sales. I introduced a number of beginners and handmade jewelry enthusiasts I met to my blog! I also got to spend time with family in Collingwood. So all in all a pleasant weekend despite my nagging back.
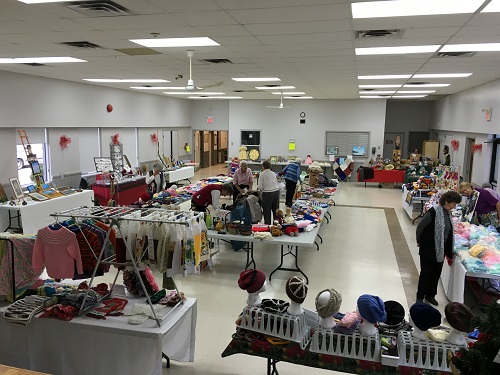
There were actually two halls. I was in the larger of the two. My booth can be seen on the left between my uncle's paintings and wooden bird sculptures! This hall was so well lit that I didn't have to use my spotlight lamps. There were no curtained booths which didn't matter as the neutral light grey walls and fixtures worked well.
 |
| Before opening time |
Oodles of space! There were additional small square tables to go with each 8 ft x 3 ft table. I made use of the smaller table to make my booth into an L- shaped ones. The corner that met the incoming traffic was where I placed the mirror, some promotional material and the all important sign which showed close up pictures of me making some of the jewelry. The process photos makes it clear the jewelry is all handmade. I also had little plastic containers to act as baskets but not one person used it!
Many artisans like to make the tables higher with bed raisers etc. But I've never found that enough. Eye level is better. When my beading friends and I banded together as The BeadSisterHood to do some of the larger craft shows back in Halifax,
we had white stacking shelving units which Bonnie's husband made us. So I was pleased when I stumbled upon and bought a small black wrought iron bookcase in a local second hand store which I could use.
There are two schools of thought regarding how much to have on the table I am not one for the minimalist layout. I prefer to offer lots of eye candy. I've noticed a lightly stocked table can be taken in at a glance and people will keep on walking past. It's probably human nature - people do want choices. With so many tempting treasures, many did pause at my booth to really take their time perusing my wares. Basically, I made it worth their while to stop.
Over the years, I found I sold more earrings when presented on small noticeboards than when I had them on rotary stands. Indeed, people stared at my earring boards a great deal trying to choose! Note, every show is different. This one was all about earrings and bracelets! None of my higher end necklaces sold.
What made the show pleasant to do was the preparation beforehand. So here are some setup tips to keep the stress levels down.
I've always stored and transported my earring boards in large plastic bags.This year I upgraded to vacuum bags! The vacuum bags meant the earrings stayed put especially during transportation. After the show, I tossed in a small bag of crystal cat litter (
leftover from drying flowers) and vacuum sealed again. The combination should stop the tarnishing during storage. A push pin poking out the back of the noticeboard punctured one of the bags so I had to put the boards back-to-back in a new bag.
Might be an idea to use vacuum bags even for rotary stands, eh?
I know many of you do this. Load all priced necklaces onto displays and put each into a zip lock bag before packing them into boxes. I store and display most of my bracelets in boxes. I also go for translucent storage boxes so I can immediately see which box I am picking up.
The best investment I made this year was the
Cosco Shifter Multi-Position Heavy Duty Folding Hand Truck and Dolly
! It meant I could pretty well put my entire stock on it. And it folded down for storage under the craft show table.
With this dolly, I made only two trips from the van to craft booth (and similarly in reverse at take down). The light wrought iron bookcase and the rolling tool box
which held my tools, findings and packing supplies constituted the second trip.
I'm not really that fond of the toolbox I have. I recommend one with drawers would made access to supplies easier. But it rolls around very easily! Besides I've had it for years and it is still in good condition.
Do you have any set up tips to share?
Disclosure
Before You Go:
______________________________
Original Post by
THE BEADING GEM
Jewelry Making Tips -
Jewelry Business Tips
